 By Rakesh Joshi
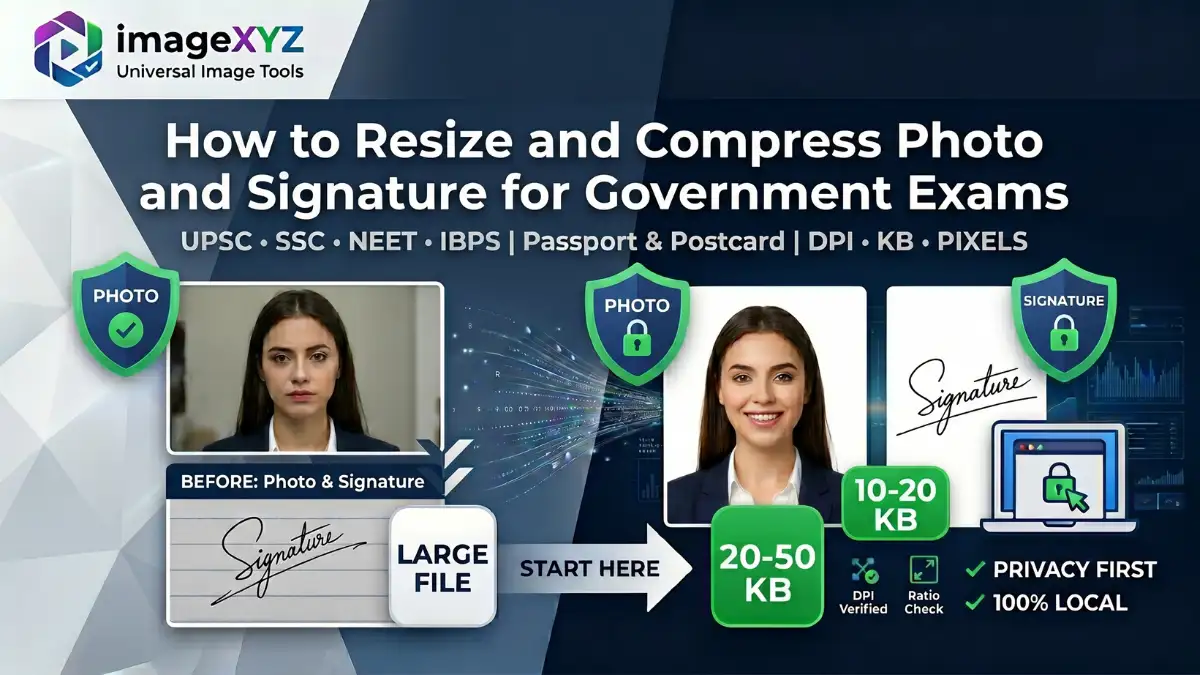
Registering for Indian state and central government examinations (such as UPSC, NEET, SSC, IBPS, or state PSCs) is an exciting milestone in an applicant's career. However, while filling out academic records is relatively simple, thousands of candidates frequently hit a critical roadblock at the document upload stage. Portal upload engines are notoriously strict, and in this comprehensive walkthrough, we will show you exactly how to resize and compress photo and signature for government exams locally in your browser to avoid administrative rejection.
Uploading a document that exceeds the portal's limits by even 1KB, or has incorrect width-to-height dimensions, will trigger automated validation errors. Rather than panicking or compromising your privacy by uploading private personal documents to untrustworthy remote server converters, you can perform the entire cropping, scaling, and compression sequence inside your own browser window. Because ImageXyz operates entirely on client-side sandboxing, your files are never transmitted across the internet, protecting you from identity theft.
Privacy First local processing
Unlike other image resizers that upload your sensitive documents to remote servers, ImageXyz uses HTML5 Canvas APIs inside your local browser sandbox. Your signature and identity photos never leave your device.
Why Portals Enforce Rigid Image Dimensions and File Limits
It can feel frustrating to have an application blocked just because a signature file is 21KB instead of 20KB. However, government recruitment boards manage massive operations. Organizations like the Staff Selection Commission (SSC) or Union Public Service Commission (UPSC) receive millions of registration files per recruiting cycle. Storing high-resolution, uncompressed multi-megabyte photos would quickly crash their databases and slow down candidate verification portals.
Additionally, modern portals run documents through Optical Character Recognition (OCR) scanners and face-matching scripts before human verification. If your passport photo has severe shadows, an incorrect aspect ratio, or is blurry, the AI face detection filters will immediately flag the application. To ensure your files pass validation, you must satisfy three key variables:
- File Size (KB): The actual storage weight of the file. Typically, signatures must be between 10KB-20KB, while passport photos must be between 20KB-50KB (or 20KB-300KB for UPSC).
- Pixel Dimensions (px) / Aspect Ratio: The physical width and height ratio. Portals demand either exact ratios (such as square 1:1) or exact centimeter/millimeter sizing.
- Resolution (DPI): Dots Per Inch, which dictates printing density. Standard portals require files rendered at 200 DPI or 300 DPI.
Official Image & Signature Specifications Comparison
Before editing your files, determine the exact guidelines required by the portal. Below is an updated quick reference table of the specifications mandated by the most popular testing agencies in India:
| Exam Body | Document Type | Mandated Size (KB) | Preferred Dimensions (cm / px) | Required DPI | File Format |
|---|---|---|---|---|---|
| UPSC | Passport Photo | 20 KB to 300 KB | 3.5 x 4.5 cm (Min: 350x350 px, Max: 1000x1000 px) | 300 DPI | JPG / JPEG |
| Signature | 20 KB to 300 KB | 3.5 x 4.5 cm (Min: 350x350 px, Max: 1000x1000 px) | 300 DPI | JPG / JPEG | |
| SSC | Passport Photo | 20 KB to 50 KB | 3.5 cm x 4.5 cm (or 200 x 230 px) | 200 DPI | JPG / JPEG |
| Signature | 10 KB to 205 KB | 4.0 cm x 2.0 cm (or 140 x 60 px) | 200 DPI | JPG / JPEG | |
| NEET / NTA | Passport Photo | 10 KB to 200 KB | 3.5 cm x 4.5 cm (or 320 x 240 px) | 200 DPI | JPG / JPEG |
| Signature | 4 KB to 30 KB | 3.5 cm x 1.5 cm (or 140 x 60 px) | 200 DPI | JPG / JPEG | |
| IBPS / SBI | Passport Photo | 20 KB to 50 KB | 4.5 cm x 3.5 cm (or 200 x 230 px) | 200 DPI | JPG / JPEG |
| Signature | 10 KB to 20 KB | 3.0 cm x 1.5 cm (or 140 x 60 px) | 200 DPI | JPG / JPEG |
The Three Pillars of Image Optimization
Understanding the difference between cropping, resizing, and compressing is essential to maintaining high quality when working within tight file constraints.
1. Cropping: Removing Unwanted Background
Cropping eliminates extraneous elements, such as background clutter or the borders of a scanned page, and establishes the correct aspect ratio. For example, if you snap a photo of your signature with a smartphone, you must crop it tightly around the ink lines to ensure the text-to-space ratio matches the portal's expectation. For passport photos, you must crop the image so that your head, shoulders, and chest are centered, with your face occupying roughly 70-80% of the frame.
2. Resizing: Changing the Pixel Resolution
Resizing changes the actual number of pixels that make up the image. If you attempt to compress a full-resolution 12-megapixel smartphone image directly down to 20KB, the compression engine must discard a huge amount of color data, resulting in a heavily pixelated image. Instead, downscale the image first to the portal's expected dimensions (e.g. 350x350 pixels for UPSC, or 200x230 pixels for SSC). Reducing the image resolution first allows you to achieve the target file size while maintaining a high quality level.
3. Compression: Reducing File Weight
Compression shrinks the storage size of the file (in KB) by optimizing how color data is stored. JPEG compression uses quantization tables to discard color nuances that the human eye is less sensitive to. By using a quality slider, you can determine how much data is discarded. On ImageXyz, our algorithms adjust both dimensions and compression quality dynamically, ensuring you meet the exact KB limit without introducing blurriness.
How to Capture and Prepare Files Using a Smartphone
You don't need a high-end flatbed scanner to prepare your documents. You can get professional results using your smartphone by following these guidelines:
Guidelines for Passport Photos
Stand against a plain, light-colored wall (preferably white or light blue). Ensure there are no shadows on your face or background by standing near a natural light source, like a window. Keep your eyes open, maintain a neutral expression, and look directly at the camera. Avoid selfies, caps, and spectacles with tinted lenses or glare.
Guidelines for Signatures
Use a clean, unruled sheet of plain white printer paper (do not sign on lined notebook paper). Sign using a black ink pen (ballpoint or gel). Black ink is strongly preferred by OCR scanners and is less likely to be rejected than blue ink. Take the photo directly from above to avoid perspective distortion, and ensure your hand or phone does not cast a shadow over the signature.
Watch Out for Rule Changes!
Certain exam boards, such as the Staff Selection Commission (SSC), now require candidates to upload a live photo taken directly through their webcam during the application process. However, you will still need to upload a pre-cropped, scanned signature. Always check the latest notification carefully before starting your application.
Detailed Platform Walkthroughs for Major Exams
Each recruitment portal has its own unique rules. Let's look at how to prepare files for each exam:
UPSC Online Portal (Union Public Service Commission)
The UPSC portal accepts images only in JPG or JPEG format. Both the photo and signature must meet the same specifications: a minimum size of 20KB and a maximum size of 300KB. The dimensions must be between 350x350 pixels and 1000x1000 pixels. To make the process easier, we built the dedicated UPSC Image Resizer. Simply upload your files, adjust the crop box to a square, and the tool will automatically output a file within the 20KB-300KB range at the correct dimensions.
SSC Portal (Staff Selection Commission)
The Staff Selection Commission has very strict specifications. Photos must be between 20KB and 50KB, with physical dimensions of 3.5 cm x 4.5 cm. Signatures must be between 10KB and 20KB, with physical dimensions of 4.0 cm x 2.0 cm. To ensure your files meet these requirements, use the SSC Photo Resizer or SSC Signature Resizer. Additionally, if you need to add your name and the date the photo was taken at the bottom, run the photo through our Name & Date on Photo Editor before resizing.
NEET & NTA Portals (National Testing Agency)
The National Testing Agency (NTA) requires two types of photos for NEET: a standard passport photo (10KB to 200KB) and a larger postcard-size photo (4" x 6", 10KB to 200KB). Signatures must be between 4KB and 30KB. The passport photo must have a white background, and the candidate's face must cover at least 80% of the image, with ears clearly visible. Use our NEET Photo Resizer to easily resize both types of photos, and use the Signature Resizer to prepare your signature within the strict 4KB-30KB limit.
How DPI (Dots Per Inch) Affects Portal Validation
DPI represents the print density of an image. Many exam portals specify that images must be scanned at 200 or 300 DPI. Smartphone photos default to 72 DPI, which can lead to portal validation errors. Fortunately, you can easily adjust this metadata without stretching the image pixels. Upload your image to our Image DPI Checker to check its properties. If it is set to 72 DPI, use our DPI Converter to output a 300 DPI or 600 DPI file that satisfies the portal's validation checks.
Step-by-Step Preparation Checklist Using ImageXyz
Follow this checklist to prepare your documents for submission:
- Capture: Take a high-quality photo of your passport photo and signature under clean lighting.
- Crop: Use the Passport Photo Maker to crop the background and center your face, or crop your signature tightly.
- Merge (If Required): If the portal requires uploading your photo and signature together in a single file, use the Merge Photo and Signature Tool.
- Resize & Compress: Select the dedicated resizer tool for your exam, adjust the file size sliders to your target range, and click download.
- Format Check: Ensure the file extension is a lowercase `.jpg` or `.jpeg` to avoid legacy portal errors.
Frequently Asked Questions
Why is my photo rejected by the SSC portal even if the size is under 50KB?
What is the correct DPI requirement for UPSC exam portals?
Can I sign in blue ink for official central government exam forms?
Does compressing my signature to 10KB reduce its readability?
Are my uploaded photos and signatures safe on ImageXyz?
Why does the portal say 'unsupported format' when uploading a JPG?
By following these steps and using the local, privacy-first tools at ImageXyz, you can prepare your documents for any government exam in seconds, without risking your personal data.