 By Rakesh Joshi
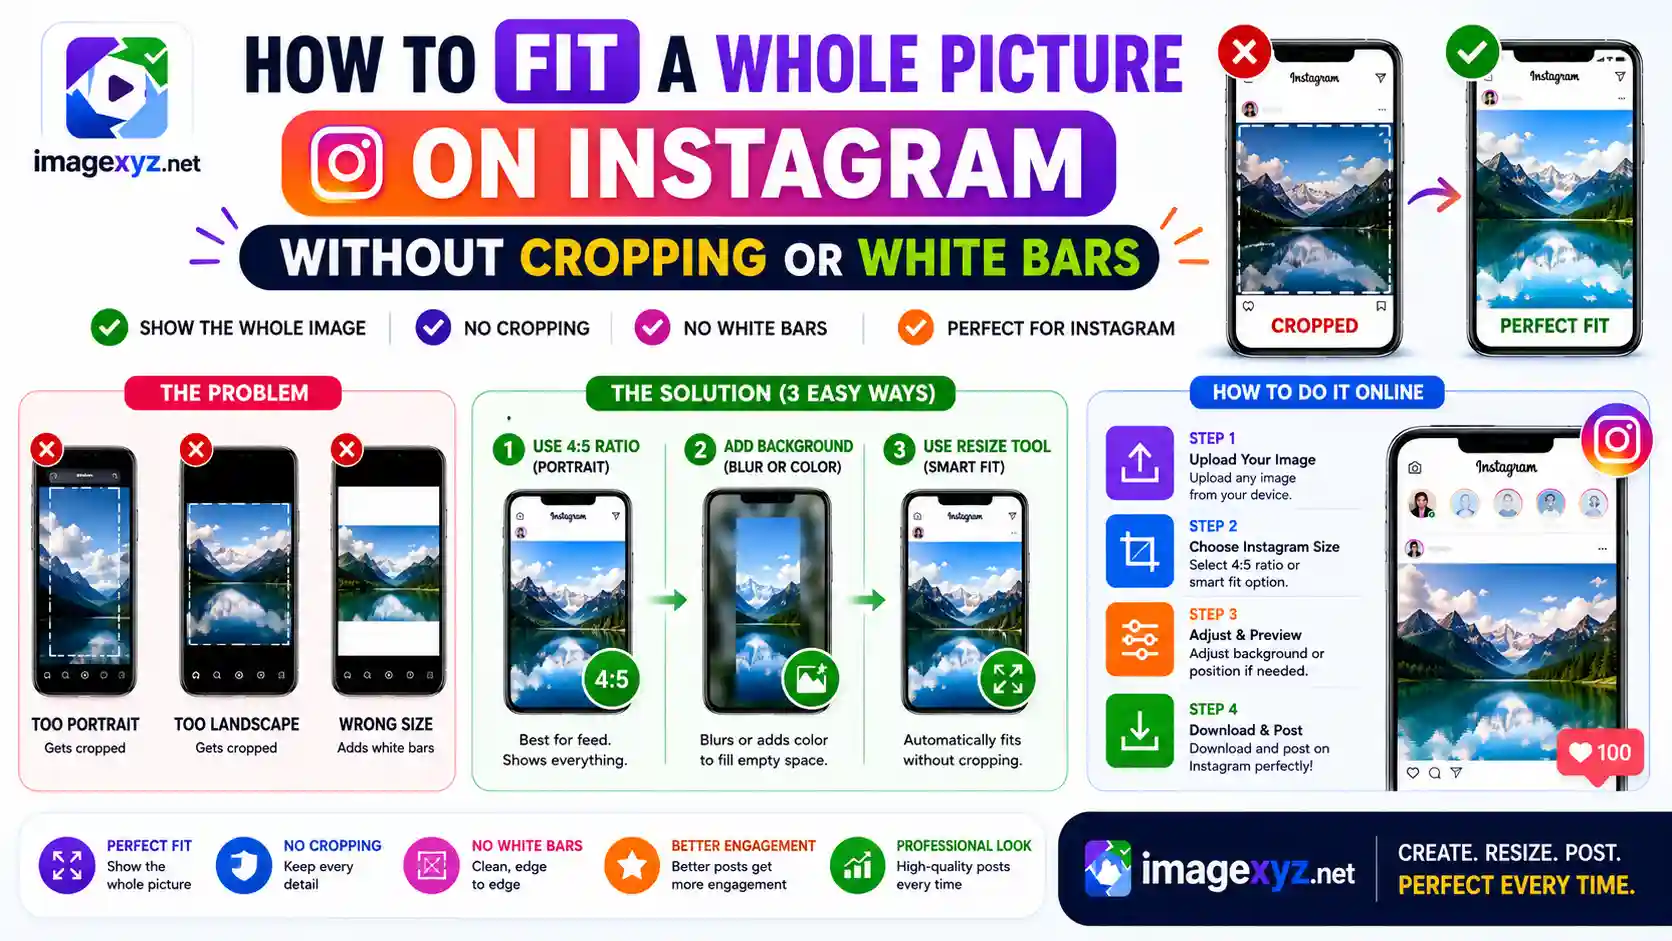
For creators, businesses, and casual users alike, Instagram is one of the most powerful visual storytelling platforms. However, one of the platform's most persistent and frustrating limitations is its rigid aspect ratio constraint. When you try to upload a stunning vertical portrait, a wide landscape shot, or a group photo, the native app forces you to make a compromise: either let the interface automatically crop out key details, or add solid white borders that break the flow of your clean grid. Learning How to Fit a Whole Picture on Instagram Without Cropping or White Bars is the key to maintaining the visual integrity of your work while preserving a professional feed aesthetic. This comprehensive guide covers Instagram's ratio rules, the design drawbacks of flat borders, and step-by-step techniques to optimize your photos locally and securely.
When preparing your graphics for social media, uploading private personal photos to remote cloud resizing services exposes you to data leaks and metadata tracking. ImageXyz processes all formatting operations locally inside your browser memory. Whether you are using our browser-based Resize Image for Instagram Without Cropping tool, creating sequential slide sets using Instagram Grid Maker, or trimming focus areas with our Square Image Cropper, you can ensure full design control and absolute privacy.
Fit the Full Image on Instagram Instantly
Stop letting Instagram crop your visual content. Pad your landscape and vertical photos using our local, browser-based blur-border editor. Open our client-side Instagram Image Resizer to prep your assets securely with zero file uploads.
Deconstructing Instagram's Aspect Ratio Requirements
To understand why Instagram forces crops, we must analyze the mathematical grid rules of the platform. Aspect ratio represents the proportional relationship between the width and height of an image. Instagram operates strictly within three predefined ratio boundaries for feed posts:
- Square (1:1 Aspect Ratio): The traditional grid standard. The recommended display resolution is 1080 x 1080 pixels. If you upload a file with different width and height values, the default cropping tool centers a square selection box over it, discarding the edges.
This traditional layout remains popular for grid layouts because it ensures alignment. However, standard square cropping can crop off key details in landscape formats (such as wide horizons) or portraits (such as heights of buildings). Utilizing custom padding or background extensions keeps these details fully visible within the square box. - Vertical / Portrait (4:5 Aspect Ratio): The most engaging format for feeds because it occupies the maximum vertical screen space on mobile viewports. The recommended resolution is 1080 x 1350 pixels. If you upload a taller portrait (such as a 9:16 phone screenshot), Instagram crops the top and bottom of the frame to fit the 4:5 limit.
Because a 4:5 post occupies around 80% more screen space than a horizontal layout on mobile displays, it leads to higher interaction rates. However, many smartphone cameras capture in 3:4 or 9:16 ratios, meaning direct uploads get cropped. Sizing your canvas correctly beforehand prevents this issue. - Horizontal / Landscape (1.91:1 Aspect Ratio): Used for wide landscape photos or horizontal group shots. The recommended resolution is 1080 x 566 pixels. Wide panoramic shots are compressed to fit inside this frame, resulting in significant details becoming too small to see.
Landscape ratios are rarely used because they occupy little vertical screen space, meaning users scan past them quickly. Converting landscape images into 1:1 or 4:5 ratios using blur-padding borders lets you display the full wide photo while taking up more screen space.
The Border Dilemma: Cropping vs. White Bars
To avoid losing details to auto-cropping, many creators use third-party apps to add solid borders to pad the image into a standard 1:1 or 4:5 container. While this keeps the whole photo visible, it introduces several layout problems:
- Grid Visual Inconsistency: A cohesive grid profile relies on cards aligning seamlessly. Adding solid white margins to landscape photos creates an irregular grid pattern of thick lines and empty gaps that disrupts the flow of your feed.
- Dark Mode Clashes: Solid white bars look okay on a white background, but they stand out harshly when viewed by users in Instagram's dark mode, making the post look unpolished. Conversely, using black bars causes the opposite problem for light mode users.
- Reduced Engagement: Shrinking your image to fit inside a border reduces the size of the core subject. On small mobile screens, this makes it harder for viewers to see details, lowering likes, comments, and shares.
Professional Methods to Post Uncropped Photos
To preserve your layout aesthetics while displaying your entire image, use one of these three expert formatting methods:
The Blur-Border Padding Technique
This is the standard industry method used by top travel and lifestyle channels. It works by copying your image, stretching and blurring the background layer to fill the target aspect ratio box (like 1:1 or 4:5), and overlaying the sharp, original image on top.
This creates a visually pleasing margin using the exact color scheme of the photo, eliminating harsh lines. It works well for both wide landscapes and tall screenshots, providing a seamless look for both light and dark mode users.
Our local Instagram Image Resizer applies this blur-border effect in milliseconds directly inside browser memory.
Seamless Multi-Slide Carousel Splitting
For wide landscape shots or panoramic photography, adding margins can shrink the details too much. Instead, slice your panoramic photo into multiple consecutive 1:1 or 4:5 cards.
When posted as an Instagram carousel, users can swipe across the slides to view the continuous, uncropped panoramic shot at full resolution. To implement this without visible seams, make sure each sliced segment aligns perfectly at the borders. You can automate this process using our client-side Instagram Grid Maker.
Asymmetric Content Padding
For minimalist or editorial aesthetics, you can pad your photo offset from the center of a square canvas, leaving whitespace for text or using subtle, off-white colors that match the image tones. This gives the post a clean, editorial look, similar to a physical gallery mount, which works well for design portfolios.
This layout style is highly popular in art and design feeds. By matching the canvas background to the dominant neutral color of the image, the frame feels intentional and organic rather than a lazy workaround.
Technical Details: Resolving Layout Shift and DPI Requirements
When preparing files for upload, pay attention to these technical parameters to ensure your images display at highest quality:
- Target Width Dimensions: Always export your files with a width of exactly 1080 pixels. If you upload a wider file (e.g. 4000px), Instagram's compression algorithms will resize it down, which can introduce artifacts and blur your details. If you upload a smaller file (e.g. 600px), the platform will upscale it, making it look pixelated.
- JPEG Compression Ratio: Save JPEGs at a quality setting between 80% and 85%. This keeps the file size small enough to bypass Instagram's heavy-handed automated compression, ensuring your uploaded file remains sharp.
- Color Profiles (sRGB): Always convert your image colors to the sRGB color profile before exporting. Instagram does not support wider profiles (like Adobe RGB or ProPhoto RGB). Uploading images in wider profiles will result in dull, washed-out colors when rendered on mobile devices.
Why Instagram's Compression Engine Ruined Your Image Quality (And How to Prevent It)
Have you ever noticed that after spending hours perfecting a high-resolution photograph, it looks soft, blocky, or blurry once posted to Instagram? This quality drop occurs because of the platform's backend media processing pipeline. Instagram hosts billions of active accounts and must conserve petabytes of network bandwidth. To achieve this, it passes every uploaded image through an aggressive automated re-compression engine that downsizes images and reduces their file size, often at the expense of visual clarity.
One of the worst culprits for quality degradation is the solid white or black border. When you attempt to solve the formatting issue by adding a flat, solid white canvas, you create a sharp, high-contrast edge between your image and the border. In digital image compression (especially with the JPEG standard), processing high-contrast, perfectly sharp edges introduces a mathematical artifact known as the Gibbs Phenomenon or "ringing" artifacts. This manifests as ugly, blocky noise and pixelated distortion along the edges of your photo. The compressor tries to reconcile the sudden jump from a dark pixel in your photo to a bright white pixel in the border, spreading compression noise across both areas.
By using the blur-border padding method instead of flat solid colors, you introduce a soft, gradual gradient of matching colors at the edges. Since digital compression algorithms like JPEG's Discrete Cosine Transform (DCT) or WebP's spatial prediction are optimized for smooth transitions, the compression engine handles the blurred borders effortlessly. This prevents edge ringing, eliminates blocky macroblock artifacts, and keeps the central subject of your photo looking exceptionally sharp. Preparing your photo to match Instagram's exact required size and aspect ratio beforehand ensures the server-side compressor does not have to scale your image up or down, preserving your original pixel alignment.
Understanding Color Spaces: Why Your Vibrant Photos Look Dull on Instagram
Another common issue when learning how to fit a whole picture on Instagram without cropping or white bars is color distortion. You might capture a shot on a modern iPhone or Samsung Galaxy that looks vibrant in your camera roll, but the moment it is uploaded, the colors look flat, desaturated, or muddy. This is a direct consequence of color space mismatch.
Modern mobile cameras and professional DSLRs often capture images using wide color gamuts such as Display P3 or Adobe RGB. These color spaces are capable of displaying a wide range of highly saturated greens, reds, and deep blues. However, web browsers and social media platforms are built around the standard web color profile: sRGB. When you upload a wide-gamut image, Instagram's system strip out the embedded color profile metadata or misinterprets the colors, mapping the wider range down to the smaller sRGB space incorrectly. This results in the vibrant colors of your original photo looking dull and lifeless.
To avoid this, you should always perform a local color conversion to sRGB before exporting your image. Our local Resize Image for Instagram Without Cropping editor does this automatically, converting your image's pixels to the sRGB color profile inside your browser. This ensures that the colors you see while editing match the colors displayed on mobile screens worldwide. By managing both the aspect ratio and the color space locally, you can publish your graphics exactly as you intended, with no unexpected crop marks or muddy details.
Step-by-Step Optimization Workflow with ImageXyz
Follow this checklist to format and publish your images without cropping or quality loss:
Determine the Target Post Layout
Identify the ideal aspect ratio for your image. For landscape and group photos, a 1:1 square canvas with blur padding is usually best. For vertical photos or screenshots, choose the 4:5 portrait frame to maximize screen space.
Process the Image Locally
Import your file into ImageXyz's Resize Image for Instagram Without Cropping tool. Select your target ratio (1:1 or 4:5) and choose the "Blur Background" option. The tool duplicates the asset, blurs the bottom layer, and overlays your clean, uncropped photo on top, running the entire process inside your browser sandbox.
Save as High-Quality WebP or JPEG
Save your optimized file. Keep sRGB colors enabled and set JPEG compression quality between 80% and 85% to ensure it remains sharp when uploaded to Instagram.
Publish to Your Grid
Upload the processed file using your mobile app or desktop dashboard. The padded image will fit Instagram's requirements perfectly without cropping, maintaining your clean grid layout.
Summary Aspect Ratio and Resolution Guide
| Format | Aspect Ratio | Ideal Pixel Dimensions | Recommended Optimization Method |
|---|---|---|---|
| Square Feed | 1:1 | 1080 x 1080 px | Direct export or 1:1 blur-border padding |
| Vertical Feed | 4:5 | 1080 x 1350 px | 4:5 blur-border padding for 9:16 screenshots |
| Landscape Feed | 1.91:1 | 1080 x 566 px | 1:1 square container padding to protect detail size |
| Panoramic Feed | Multi-Slide | 1080 x 1350 px (per slide) | Seamless slicing using Instagram Grid Maker |